Installation Preparation and Recommended Tools
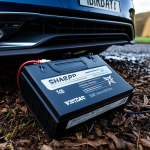
Before starting a Suzuki V-Strom 1000 GPS tracker install, preparation is critical to ensure a smooth process. First, identify the best GPS tracker models compatible with your motorcycle. Compatibility depends on size, power requirements, and connectivity options tailored for the V-Strom 1000. Popular models often balance discreetness with signal strength, which enhances theft protection.
Gathering essential tools is your next step. For effective installation, you will need:
A lire aussi : Transform Your Honda CB500X: The Ultimate DIY Guide to Installing a Top Case for Enhanced Storage Solutions
- A multimeter for verifying electrical connections
- Wire strippers and crimping tools for secure wiring
- Electrical tape and heat shrink tubing to insulate connections
- Screwdrivers and zip ties for mounting the unit properly
Workspace safety cannot be overlooked. Choose a clean, well-lit area with ample room to maneuver around your bike. Disconnect the battery before handling wiring to prevent electrical shorts or shocks. This step safeguards both you and your bike’s electrical system, preserving the integrity of the Suzuki V-Strom 1000 wiring.
By thoroughly preparing and assembling recommended tools, you set yourself up for a straightforward, efficient GPS tracker installation that ensures long-term reliability and security.
A lire aussi : Comprehensive Crash Bar Installation Manual: Enhance Your BMW R1250GS Protection Today!
Installation Preparation and Recommended Tools
Before beginning a Suzuki V-Strom 1000 GPS tracker install, selecting the right GPS tracker models compatible with this motorcycle is essential. Focus on models designed for motorcycles, offering robust water resistance and reliable signal reception. Popular options typically feature compact designs suitable for discreet placement on your bike without interfering with its electrical system.
Preparation is key to success. Gather essential tools including a wire stripper, soldering iron or crimp connectors, insulated electrical tape, and a multimeter for testing circuits. Also, have zip ties and mounting brackets ready for securing the GPS unit tightly. These tools ensure a clean and secure installation, reducing the risk of wiring issues.
Workspace safety cannot be overemphasized. Disconnect the Suzuki V-Strom 1000 battery before starting to prevent short circuits. A well-lit, dry workspace allows careful handling of wiring according to the tracker’s manual. Following these preparation steps simplifies the install, ensuring the tracker operates effectively and safely once mounted.
Step-by-Step GPS Tracker Installation Process
Carefully following a step-by-step GPS tracker installation process tailored for the Suzuki V-Strom 1000 ensures reliable results. Begin by selecting the ideal GPS unit placement. The best location balances concealment with strong satellite signal reception—often under the seat or near the battery compartment works well. Avoid areas with excessive heat or moisture.
Next, use the Suzuki V-Strom 1000 wiring guide to identify appropriate power connections. Typically, the tracker requires a constant 12V source for operation. Locate the ignition switch positive wire and the ground wire using a multimeter. Connect the GPS power wires securely, applying crimp connectors and insulating with heat shrink tubing or electrical tape to prevent shorts.
Once wiring is complete, firmly secure the GPS tracker to the chosen spot using zip ties or mounting brackets. Ensure none of the wires are pinched or exposed to sharp edges; this prevents damage during riding.
Finally, reconnect the battery and test the unit’s power and signal reception. This step-by-step installation method combined with correct GPS unit placement and secure wiring maximizes durability and functionality for your Suzuki V-Strom 1000 GPS tracker install.
Step-by-Step GPS Tracker Installation Process
Installing a GPS tracker on the Suzuki V-Strom 1000 requires careful adherence to a clear, step-by-step process. First, select an optimal GPS unit placement. Ideal locations include under the seat or inside compartments, where the tracker stays hidden yet retains strong satellite signal reception.
Next, refer to the Suzuki V-Strom 1000 wiring guide to identify power sources. Most trackers tap into the bike’s 12V system, linking to ignition or battery power for constant operation. Use a multimeter to confirm voltage and polarity before making connections.
When wiring, strip wires carefully and use crimp connectors or solder joints for secure, reliable contacts. Insulate all exposed wiring with electrical tape or heat shrink tubing to avoid shorts. Secure wires with zip ties, routing cables away from moving parts or heat sources.
Finally, mount the GPS tracker firmly using brackets or zip ties to prevent vibrations or displacement during rides. Test tracker functionality by powering the bike, confirming GPS signal acquisition and device communication with its app or platform. Following this detailed process ensures your Suzuki V-Strom 1000 GPS tracker install is both effective and durable.
Installation Preparation and Recommended Tools
Proper preparation is key for a successful Suzuki V-Strom 1000 GPS tracker install. Start by selecting GPS tracker models that offer compatibility with the bike’s electrical system and provide reliable signal reception. Look for units designed for motorcycles, emphasizing compactness, water resistance, and ease of concealment.
Essential tools for installation include a multimeter to verify power sources and ground connections accurately. Wire strippers and crimping tools are necessary to prepare wiring connections securely. Use insulated electrical tape or heat shrink tubing to guard against short circuits once wires are joined. Zip ties and mounting brackets help firmly attach the GPS tracker to the chosen location without risk of movement or damage during rides.
Workspace safety cannot be underestimated. Before starting, always disconnect the Suzuki V-Strom 1000 battery to eliminate the risk of electrical shorts. Work in a clean, dry, and well-lit area to enhance visibility and precision during wiring tasks. These preparatory steps and tools reduce errors and ensure a durable, functional installation of your GPS tracker on the Suzuki V-Strom 1000.
Installation Preparation and Recommended Tools
Proper preparation is crucial for a successful Suzuki V-Strom 1000 GPS tracker install. Identifying the best GPS tracker models involves ensuring compatibility with the bike’s electrical system and physical dimensions. Models designed specifically for motorcycles usually provide superior water resistance and compact size, making installation easier while maintaining durability against riding conditions.
Essential tools streamline the installation and reduce errors. A multimeter helps verify power sources and wiring integrity. Wire strippers and crimp connectors or soldering irons ensure secure and durable electrical contacts. Insulating materials such as electrical tape or heat shrink tubing prevent shorts and corrosion. Mounting supplies like zip ties and brackets keep the tracker steady and protect wires from damage.
Safety during installation is non-negotiable. Disconnect the Suzuki V-Strom 1000 battery to avoid accidental shorts or shocks. Work in a dry, well-lit area free from clutter to facilitate precise soldering or crimping tasks. Following these recommended preparation steps and assembling the right tools enhances installation quality, ensuring your GPS tracker performs reliably for theft protection and location tracking.
Installation Preparation and Recommended Tools
Choosing the right GPS tracker models is critical for a successful Suzuki V-Strom 1000 GPS tracker install. Prioritize models specifically designed for motorcycles, ensuring they offer compact size, strong water resistance, and seamless integration with the bike’s 12V electrical system. Compatibility minimizes installation complexity and enhances durability.
Essential tools include a reliable multimeter to accurately check power sources and grounding points following the Suzuki V-Strom 1000 wiring guide. Wire strippers and crimping pliers enable clean, secure connections vital for preventing failures. Electrical tape or heat shrink tubing protects against shorts and moisture ingress. Additionally, have sturdy zip ties and mounting brackets ready to securely fasten the GPS tracker, minimizing vibration-related damage during rides.
Workspace safety is paramount. Always disconnect the Suzuki V-Strom 1000 battery before beginning to prevent electrical shorts or accidental shocks. Work in a well-lit, ventilated, and dry environment to ensure precise wiring and avoid moisture-related issues. These preparatory measures and tools together streamline your install, reducing errors and ensuring the longevity of your GPS tracker installation.
Installation Preparation and Recommended Tools
Choosing the right GPS tracker models for your Suzuki V-Strom 1000 is foundational to a successful install. Prioritize models designed specifically for motorcycles, as they typically provide optimal water resistance and compactness, fitting easily in tight spaces without compromising durability. Compatibility with the bike’s electrical system ensures seamless integration and consistent power supply.
Gathering the correct tools enhances efficiency and accuracy during installation. Essential items include a multimeter to verify electrical connections and voltages, wire strippers for cleanly preparing wires, and crimping tools or soldering irons to secure solid, conductive joints. Insulation materials such as heat shrink tubing or electrical tape protect against short circuits and environmental damage. Additionally, mounting supplies like zip ties and brackets keep the tracker stable to prevent vibrations or wire chafing.
Safety procedures are critical. Always disconnect the Suzuki V-Strom 1000 battery before beginning to avoid electrical shorts or shocks. Work in a clean, dry, and well-lit environment to facilitate precise wiring. These preparation steps and the right tools establish a stable foundation for a durable and efficient Suzuki V-Strom 1000 GPS tracker install.
Installation Preparation and Recommended Tools
Selecting the right GPS tracker models is foundational for a successful Suzuki V-Strom 1000 GPS tracker install. Focus on models built for motorcycles, offering robust water resistance and compact design to fit snugly without interfering with bike mechanics. Prioritize units compatible with the V-Strom 1000’s 12V electrical system to simplify integration.
Essential tools streamline this process. Use a reliable multimeter to verify power and ground points according to the Suzuki V-Strom 1000 wiring guide, ensuring accurate connections. Wire strippers and crimping pliers help create durable, clean links—key to avoiding electrical faults. Protect your wiring with insulated tape or heat shrink tubing to prevent shorts and corrosion from exposure to elements. Secure the GPS tracker with sturdy zip ties or mounting brackets to minimize vibrations and movement.
Workspace safety is critical. Always disconnect the Suzuki V-Strom 1000 battery before beginning any wiring tasks to prevent short circuits or shocks. Work in a well-lit, dry environment free of clutter to maintain focus and precision throughout the installation. Proper preparation and tools reduce errors and ensure a reliable, long-lasting GPS tracker setup on your Suzuki V-Strom 1000.
Installation Preparation and Recommended Tools
For a successful Suzuki V-Strom 1000 GPS tracker install, carefully selecting compatible GPS tracker models is essential. Choose units designed specifically for motorcycles, which offer compact sizes, reliable waterproofing, and seamless integration with the V-Strom’s 12V electrical system. Prioritizing compatibility ensures easy installation and durable performance under varied riding conditions.
Essential tools for your installation include:
- A multimeter to accurately identify power and ground points according to the Suzuki V-Strom 1000 wiring guide
- Wire strippers and crimping tools for clean, secure electrical connections
- Heat shrink tubing or electrical tape to insulate and protect wiring from moisture and shorts
- Zip ties and mounting brackets to firmly secure the tracker, preventing damage from vibrations
Safety cannot be overstated. Always disconnect the Suzuki V-Strom 1000 battery before beginning to avoid electrical shocks or short circuits. Work in a clean, dry, and well-lit environment to enhance visibility and precision during wiring tasks. This comprehensive preparation, including selecting the right GPS tracker models and gathering the correct tools, lays the groundwork for an effective and reliable GPS tracker installation.
Installation Preparation and Recommended Tools
Identifying the best GPS tracker models for a Suzuki V-Strom 1000 GPS tracker install involves prioritizing units designed specifically for motorcycle use. Such models are typically compact, water-resistant, and compatible with the bike’s 12V electrical system. Choosing an appropriate tracker ensures it fits snugly without interfering with essential bike functions while maintaining reliable signal reception.
Preparation also requires gathering essential tools for a secure and efficient installation. These include a multimeter for verifying voltage and ground points accurately, wire strippers and crimping pliers to create solid electrical connections, and insulated electrical tape or heat shrink tubing for protecting these connections from moisture and short circuits. Additionally, sturdy zip ties and mounting brackets are necessary to anchor the GPS tracker firmly, minimizing vibration damage during rides.
Workspace safety is paramount. Always disconnect the Suzuki V-Strom 1000 battery before starting wiring to prevent shocks or shorts. Choose a well-lit, dry workspace free of clutter to enhance precision and reduce installation errors. These combined measures in preparation and the right tools lay the groundwork for a dependable, durable GPS tracker installation on your Suzuki V-Strom 1000.